Wednesday, September 26, 2012

The Three Keys to splitting User Stories effectively


Splitting Epics into Features is hard, splitting Features into User Stories is hard and splitting User Stories into smaller User Stories is hard. Of course it is easy to do any of those steps poorly, but we are talking about making effective splits. Effective in that the team is able to efficiently work together to continuously deliver something of value to the Product Owner. Effective in that product risk and project risk is being addressed, while maintaining a clear picture of the team’s progress. Effective in that the splits eventually result in User Stories that the team can tackle in a sprint, i.e. each User Story adheres to most of the INVEST principles.

In my mind there are three keys to unlocking the door to effective splitting of User Stories.


Key One: Understanding


Understanding is a critical key in getting teams to effectively split up User Stories. I am talking about refers to the whole team understanding the Big Picture, Business Benefit and Design.

Understanding the Big Picture
How does this User Story relate to the Feature and the Feature to the Epic? This is important because it allows the team to know which things they can defer, and knowing what can be deferred opens up plenty of options for splitting User Stories. There is more discussion of deferring things in ‘Key: Thinking Vertical’. To achieve understanding of the Big Picture it is essential that the team is involved in splitting the Epic into smaller Product Backlog Items, early in the Release Planning process ideally as it the Epic is being split into Features. If the team was not involved in splitting up the Epic from the beginning, the Product Owner should make sure that the team is aware of the big picture, probably by describing the relationship between the features to the Epic.

Understand the Business Benefit
The team should understand the business benefit that the Feature should deliver and how that contributes to the business benefit of the Epic. Understanding of the business benefit helps the team to make smart choices about how to split up the Feature. I have found that teams who do not understand the business benefit can end up making choices that unintentionally diminish those benefits. For example they may reduce the amount of error validation that is done, thinking that it is good way of keeping costs down. However, when the business benefit centres around an awesome user experience bringing customers back, this is a poor choice. In this case the reduced error handling may upset some users and hence the business benefit is also reduced. 

Understand the Design
The design should be understood by all members of the team, at least at a high level. This does not necessitate a lot of design to exist, the important point is that everyone in the team can talk in a common language about the design choices they are making and of course how that relates to splitting up the User Stories. For example testers should be able to hold meaningful conversations with developers about testing impacts based on the design and its relationship to split of User Stories. Sharing a common understanding of the design allows all members of the team to contribute ideas for splitting User Stories, which leads to item four.

Whole team understanding
The whole team should have a shared understanding of the big picture, business benefit and design. This shared understanding ensures that everyone can be involved in splitting up the User Stories and doing so in a way that represents their concerns. i.e. Testers can ensure that the User Story is Testable. Whole team understanding also speeds up estimation and builds the team commitment to delivering the User Story.


Key Two: Thinking vertically

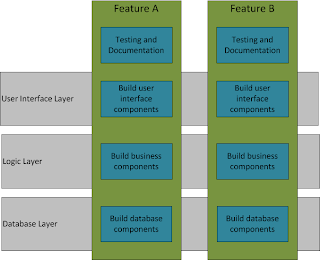
Waterfall development generally builds up the product layer by layer, or component by component, this is what I call the horizontal approach. 


Component approach to splitting user stories

Image 1: horizontal development, the blue items are units of work / poor User Stories

The downsides to his approach when used for agile development is that it builds up debt, unbalances the work amongst the team, deprives the team of early feedback, hides issues and hence hinders our ability to be agile.

The key to addressing the issues of horizontal approach; is to think vertically, to think about delivering vertical slices. Building vertical slices means that each User Story builds a piece of each layer of the product, the User Story must adhere to the Definition of Done and deliver some business value or be a solid step* towards that value. 


Vertical slice approach to splitting user stories

Image 2: vertical development, the blue items are units of work / User Stories

Usually the code that is delivered with each vertical slice is very small compared to what developers would have experienced with the horizontal approach. Some people struggle with this, as they feel that they are going slower than they have in the past. Of course this is true so it is important that we explain to them all of the benefits that come with this approach, such as:

  • Finding issues early as hence fixing them for less cost
  • Not building the bits that we thought we needed at the start but later find out we don’t need
  • The ability to get fast feedback from our Product Owner, peers and customers
  • Realistic reporting of our progress towards done
  • Delivering value with each User Story, as opposed to delivering untested code


An important concept to get across to teams that are new to the vertical approach is; they can be ruthless about things that get deferred within the release time frame. Take the example of building a new GUI customer search for call centre operators that allows for complex ‘SQL like’ queries to be create, executed and stored. There is no way we would release it to our customers with poor performance, no error handling, a clunky user experience, or half of the fields missing. Yet all of those things are great items to split out as separate User Stories, provided they will be delivered within the Release Time-frame.

*While I agree that User Stories should deliver some business value (The V from INVEST), I have found that by splitting up User Stories so that they are small enough to fit into a Sprint there are often times that the business value is not clear. At the Feature and/or Epic level it is clear what the business value is, and the User Story is clearly contributing towards that, but the User Story itself does not deliver much/if any value.


Key Three: Experience in splitting User Stories

This is a classic catch 22, a bit of experience in splitting User Stories seems to make it much easier to split the next User Story and opens up the mind to new ways of splitting User Stories. This is where an Agile Coach can really help, by working with the team to split their first couple of User Stories hence breaking out of the catch 22. Another option is to run workshops on splitting User Stories that include practical exercises. The workshops that I have run are always well received and provide teams with that vital kick start to their experiences.

For most developers that are new to agile, the vast majority of their experiences regarding splitting up work has been in splitting it horizontally. It is a hard habit to break out of thinking this way, again this is where an Agile Coach is very helpful; to show them new ways of thinking. This can be accomplished with a few hints, some probing questions and pressure for the team to stick to the Definition of Done, while delivering an increment of value.

Additionally to support the team in thinking about different splitting approaches I like to provide them with cheat sheets and short articles that describe different splitting approaches. Here are some of my favourite articles and cheat sheets: 


Causal Loop Diagrams

Thank you to Renae and Shane who helped me to find the answers to why our teams were struggling to split up Features into small User Stories. We found the answers by drawing a Causal Loop diagram together, you can find out more about Causal Loop diagrams in the book The Fifth Discipline by Peter M. Senge. If you are stuck on a complex problem, I highly recommend that you grab a couple of peers and get them to help you draw a Causal Loop Diagram about the problem.


Causal loop diagram, why teams are struggling to split user stories

Image 3: A snap shot of the Causal Loop Diagram that inspired this blog post.

Photo of keys by: mmarchin  

Friday, September 21, 2012

The benefits of time


I recently learnt first-hand the benefit that time brings, by that I mean how time for people to think through ideas and try it for themselves is crucial to success.

Usually when I give advice to someone, I spend a fair bit of my own time thinking about how they are progressing and generally worrying about the situation. My recent experience has shown that by do that I am doing myself a disservice.

The experience was as follows; a couple of teams that I had been coaching were both in tough situations for different reasons which I will not go into. I gave both of their Scrum Masters a couple of pieces of advice regarding some practices to change. Normally this is where I would have spent the coming days stressing about their progress and thinking of contingency plans. However some rather big impacts occurred in my personal life and work was the last thing on my mind. When I returned to work, I was surprised to find that both teams had achieved solid success with the suggested changes, all with no stressing on my behalf. I should not have been surprised; these were two very capable teams lead by intelligent and effective Scrum Masters.

What I took away from this event was that I need to allow more time for people to think about and trial new ideas before I check back in with them. In the mean time I can find other people and teams that I can help.

As a personal mantra: Plant the seed, don’t stress, just sit back and wait.

Photo by: Earls37a

Saturday, September 8, 2012

Top tips for Retrospectives


Tip: Change ‘Five Whys?’ to ‘Five What Caused that?’

“No problem can be solved from the same level of consciousness that created it.” Albert Einstein 

This quote is one of the many reasons why I am a big advocate of using the Five Whys techniques in Retrospectives. My experience shows me that finding and then fixing the root cause has a much longer lasting effect then fixing the reported problem (aka symptom). While the Five Whys technique is great; there a little twist that can make it even more effective for new teams.

Teams are new to Retrospectives find it a big challenge to raise issues that they are used to ignoring or hiding. Creating an environment where they feel safe to bring up issues is critically important for the success of the Retrospective.

‘Why’ is a word that puts people into a defensive state of mind.  As it focuses the respondent on their own involvement in the issue and hence, they are inclined to play down the issue for fear of making themselves look bad. Hence I prefer to phrase the Five Whys as the Five ‘What caused that?’ Using the word ‘what’ takes the focus off the respondent and lets them look at the issues that caused the symptom. This allows them to stay in a problem solving state of mind as opposed to a defensive state of mind. 

Lastly when looking at a tough problem, writing up the Five ‘What caused that’ items on a whiteboard as the team discusses the issue helps to give the discussion focus.


Tip: Validate the input of all attendees

One of the most effective techniques for creating a safe environment in Retrospectives is a simple one; validate the input of all attendees, especially the quiet people. What I do to validate their input is summarised in these points:

  • Validate each idea that is raised by either reading the idea aloud or repeat back the idea that was raised verbally.
  • Treat all people and ideas equally (even if I strongly disagree)
  • Keep the Retrospective to one conversation at a time so that everyone is involved in all of the discussions.
  • Specifically ask quiet people what they think about issues under discussion.
  • Support quiet people to get their ideas across when they do voluntarily speak up.


Tip: Prioritise and cluster

The Retrospective format that I most often use is ‘Puzzle, Problem, Try, Keep’ from Agile Retrospectives by Esther Derby and Diana Larsen.

Starting the Retrospective with five minutes for participants to write up their thoughts onto Post-it notes in silence is a method that allows everyone to provide their own unique input without being influenced by other participants. I suggest one thought per Post-It note, as it makes arranging and discussing each thought much easier. You can stick the Post-Its notes into the Puzzle column to begin with and it is usually a good idea to cluster similar thoughts.


Top Tips for Retrospectives: after posting feedback

Image 1: The teams ideas clustered in the Puzzle column by theme

With the initial thoughts clustered into the Puzzle column any important issues will stand out as a big clump. If you have lots of separate thoughts, it will be worth asking the team if there are any burning issues before proceeding. 

With the large clusters and burning issues identified you now have a set of thoughts to address first.


Tip: Use a workflow

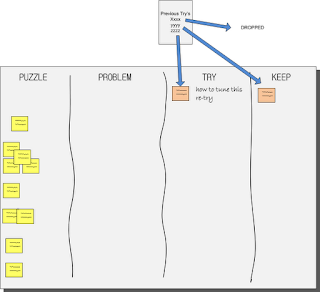
I see the ‘Puzzle, Problem, Try, Keep’ Retrospective as a workflow. Thoughts start out as Puzzles and either stay there or move to be a Problem. Problems link to Tries. Tries from previous Retrospectives were either successful and hence become a Keep, or need to be re-tried or are dropped. In general this results in a left to right workflow.

After gathering the Thoughts of the participants into the Puzzle column it is always worthwhile discussing the Tries from the previous Retrospective. Was the Try successful and hence should become a Keep. Did the Try have issues that we think we can overcome; hence it stays as a Try. Is it an abject failure, hence dropping off all together? Discussing previous tries shows the team that Retrospectives are for delivering outcomes not just suggesting Tries that are never followed up on.


Top Tips for Retrospectives: reviewing previous tries

Image 2: The Try's from last Retrospective being reviewed and placed accordingly.


Now it is finally time to address the new thoughts. I suggest discussing each thought in turn.

For puzzles and problems, use the ‘Five What Caused That?’ approach to identify the root cause, aka Problem. Once it is clear that you have a Problem move the Post-It to the Problem column and list the root cause.


Top Tips for Retrospectives: investigating top priority problem

Image 3: Put the top priority discussion topic into the Problem column and noting its root causes.


With a Problem in the Problem column that is well understood and it has a root cause identified it is time for the team to recommend one or more Tries. These are written in the Try column and you should draw arrows from the Problem to the matching Tries. The arrows represent cause and effect, ensuring that we put effort into Tries that will have some lasting impact.


Top Tips for Retrospectives: solving top priority problem

Image 4: Linking the Problem to its Try's.

For thoughts about things that went well, or items you should keep; be sure to discuss with the team why it was successful and how we can ensure it will be successful again in the future.


Tip: Find the Problem that Tries are attempting to solve

Often participant’s thoughts will be suggestions for Tries, e.g. ‘Run the tests in parallel’, or ‘Use Gradle for our build process’. In this case it is very important to understand what Problem they are attempting to solve before just adding the Post-It note to the Try column. You can use the ‘Five What Caused That?’ approach to ensure that you attempting to solve the root cause.


Top Tips for Retrospectives: finding root cause from a try

Image 5: What the board could look like at the end of a Retrospective.


Tip: Make sure Tries are turned into action

I have seen several teams that where good at coming up with Tries, yet were poor at acting on those tries; hence they did not improve as fast as they could have. The reasons for the lack of action were many and varied. Here are a few of things that I have found to help teams follow through on their Tries. They can be used in isolation or in combination.

  • Assign a single person as an Owner of each Try during the Retrospective.
  • Display the list of Tries near the teams Task board.
  • Create a Task cards for each Try and put it on the Task board.
  • Discuss the progress of each Try during Daily Stand ups.


Sunday, May 27, 2012

Fast Estimation


Imagine you have just completed some Product Discovery work and have a pile of User Stories that need to be estimated. You look at the pile and think, wow that will take hours to estimate using Planning Poker. I just want rough estimates so that we can put together a release plan. We know the plan will change in the future, but we need some starting point. What can I do? 

The answer is Fast Estimation. 

Fast Estimation is derived from Planning Poker. With some preparation and a 1 hour workshop it is common for a team to estimate about 30 User Stories. Teams I have worked with have successfully used it to estimate new functionality, automation of processes, improvements to internal practices and organisational change work.

While estimation is the main objective of the Fast Estimation process, another significant benefit you get for free is Shared Understanding. By this I mean the discussions that occur help to clarify in the minds of the team members what work is required, how it inter-relates and how big the entire backlog is. The knowledge that is gained about the backlog as a whole can often be more valuable then the estimates assigned to individual User Stories.

Fast Estimation Process

Preparation
Write out the User Stories to be estimated onto Index Cards of the same colour. A short cut that often works well is to just write the Title of the User Story on the index card and have the details of the User Story on hand during the session (i.e. in an electronic tool, or a printed spreadsheet, etc).

Find one to five Reference User Stories. These are User Stories that are well understood by the team and will act as a reference point for the upcoming comparative estimation. Ideally the team will have recently completed those User Stories or have at least estimated them in Story Points. The Reference User Stories should have differing Story Points, ideally being in the 2 to 20 range. I recommend at least three reference User Stories and usually aim for five, however you can get away with one. The case where your team is new and does not have any reference User Stories; sounds like a topic for another day. If you are really stuck just pick a User Story that you think is 3 Story Points, and use that for your Reference User Story.


Write out the Reference User Stories onto Index Cards of a different colour to the cards used for the User Stories to be estimated.


Schedule a 1 hour meeting in a room that has a long table, big enough for the team to gather around.


During the workshop
Set the scene for the workshop by explaining the following points

  • The objective of the workshop is to roughly estimate this stack of User Stories (show them the stack of Index Cards so that they can see how many there are), this will help to emphasise that time is of the essence. 
  • Fast Estimation will only rough estimates for these User Stories. 
  • There will be lots of assumptions and hence the estimates will not be very accurate.
  • The team will get another chance to re-estimate these User Stories in normal grooming session prior to starting work on the User Stories.

Layout one set up Planning Poker cards on a long conference table in ascending order i.e. 0, 0.5 .. 110, ∞.  It is a good idea to leave more space between the lower / middle numbers as hopefully more of the User Stories will end up there. If there are lots of User Stories at the large end of the scale that is a whole different problem, good luck with that ;).

Place the Reference User Stories below the Planning Poker card that corresponds to its Story Points. As per the picture below.


Fast Estimation reference user stories placed, ready to start


Picture 1: Planning Poker cards and Reference User Stories, with un-estimated User Stories at the bottom.

Confirm with the participants that they understand the Reference User Stories and agree with the Story Points for each. You may need to adjust one or more of these. Once you progress past this point, do not change the Reference User Story – Story Points any more these are now set in stone.

Divide up the User Stories roughly and hand them out to the participants.

Give the participants a couple of minutes to quickly read their set of User Stories to themselves.

Pick someone at random and ask them to read out their User Story and then place it underneath the Planning Poker card that corresponds to their estimate. Only allow a brief time for this. Ask the group if they are happy with that estimate and discuss/move it as necessary. Encourage participants to move the card if they disagree and to explain their justification at the same time.

Fast Estimation first user story placed


Picture 2: First User Story Estimated

Ask the group if there are any similar User Stories in peoples stacks. If so, repeat step 8 for those User Stories. Once there are no more similar User Stories pick another person at random and repeat step 8 for that User Story.

Work your wait through all of the User Stories, placing and discussing, finding similar User Stories, etc. etc.

Once all of the cards are all in position you can quickly write the Story Point estimate on each Index Card and gather them up.
Fast Estimation all stories estimated


Picture 3: All User Stories estimated 

As a final wrap up to the meeting it is again worth mentioning that the team may need to re-estimate these User Stories using Planning Poker before taking them into a sprint planning meeting.

A variation I have tried that did not work as well
After handing out the index cards, everyone places their cards at once in a big rush of activity. Then the team discusses them and re-estimates them as appropriate. This approach raises the energy in the room but it is a bit more confusing. Individuals will find it confusing to place their cards without the understanding of the backlog that they build up while discussing the User Stories one by one. The benefit to this approach is that very rough estimates are assigned to all of the User Stories up front, so if you run out of time at least you have everything estimated.

Teaching Fast Estimation
I have an example game to teach people Fast Estimation which extends on the fruit estimation of Planning Poker that I learnt in the Certified Scrum Master course taught by Rowan Bunning.

Write out the following Items To Cook on Index Cards, and place ‘B.L.T’ your three Story Point Reference User Story  (I have found that due to the simplicity of these User Stories 1 reference story is enough). 

Ask the participant to estimate cooking these items from scratch. I.e. for Eggs Benedict they are expected to make their own hollandaise sauce. Guide them through the Fast Estimation process,  this game usually takes less then 10 minutes (provided the participants are familiar with Planning Poker and Story Points).

Items to Cook


  • Eggs Benedict
  • Tin Baked Beans
  • Fruit Salad
  • B.L.T.
  • Crispy skinned Salmon
  • Poached Eggs Soufflé
  • Cheese Burger
  • 64 Cup Cakes
  • Garden Salad
  • Alacarte, 3 courses for two
  • Cheese Cake
  • Duck Ala orange
  • Caesar Salad
  • Alacarte, 3 courses for ten
  • Lasagne
  • Pineapple upside down cake
  • Burrito’s
  • Mashed Potato
  • Beef Korma
  • Banoffee Pie
  • Fish & Chips
  • 12 Fancy cup cakes


Interested in estimation?


Related Reading
I can recommend these blogs for other great approaches to estimating stacks of User Stories:


Training available in South East QLD, Australia

If this article was interesting to you, then your team would likely benefit from face to face training on Agile Estimation. I run a one-hour Agile Estimation training session, that is highly interactive, immensely fun and teaches the foundation of agile estimation along with how to effectively run Planning Poker as well as Fast Estimation. Please contact me to set up a training session for your team: andrewrusling@hotmail.com

Tuesday, May 8, 2012

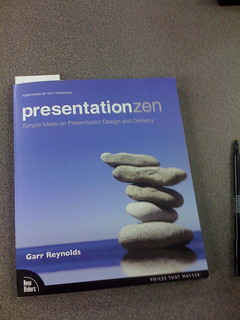
Book Review: Presentation Zen - Simple Ideas on Presentation Design and Delivery, by Garr Reynolds


Visually it is a beautiful book that shows off Garr Reynolds design skills.

If you like discussing design and the art behind it, then this book is for you. It does a good job of discussing the design of presentations from an abstract approach, the writing style of his blog Presentation Zen shines through.

However if you want to improve your presentations this book offers very little. The useful information in the book could be condensed to about 20 pages; you may be better off searching the web for articles on basic design principles.

I picked it up hoping to improve my presentations, I walk away knowing about a few more free picture sites, having seen some great examples of slides and learn a few tips. Unfortunately the Zen of presentation design has not passed into my way thinking.

2 stars

Friday, March 30, 2012

Training Course Review - Passionate Product Ownership

Course Passionate Product Ownership
Presented by Jeff Patton 
Organised by SoftEd 
Held in the Hilton Hotel Brisbane 


Overall: 5 Stars


Day 257. The Plan.


The venue, room and training materials were all prepared ahead of our arrival. The room was set up for five groups of five people. Each table was stocked with extensive pens, paper, index cards, sticky notes, printed notes, etc. There was also the book ‘Inspired’ by Marty Cagan and a USB drive with over 500Mb of material including slides, cheat sheets, guides, articles, templates, and all of the videos that he showed to us.


The catering was timely, organised and tasty, well done to the Hilton. Eating lunch in the recently refurbished restaurant was pleasant and hassle free. They took our lunch orders at morning tea and served it to us promptly on our arrival at lunch time. The facilities were great however I was not a big fan of the chairs. 


Jeff is an excellent presenter, facilitator and educator. He made it all look so easy to keep a diverse group engaged and focused for two solid days. His extensive knowledge and real world experience in many different contexts shines through as he provides examples and answers questions with ease. Combining all of his skills he was able to keep us on schedule while still addressing the widely varying needs of the audience (different contexts, skills and experience). It was very impressive to see Jeff in action.


There were practically no slides projected, he used spoken word combined with a projection of the drawings and notes that he made in real time. This approach of projecting the web cam of his drawing was very engaging. Jeff made extensive use of games to get us to experience our new knowledge and techniques in action. Towards the end of the course he gave away a copy of ‘Game Storming’ by Dave Gray. A quick flip through this book (one of my colleague one it) told me that Jeff has used plenty of ideas from this book in his course preparation and deliver. It is going onto my must read list.


Discussion regarding Scrum was limited and rightfully so. I have heard of others attending CSPO courses that are practically the same as a CSM course.


The vast majority of the two days was spent on the Discovery Phase, understanding product goals, target outcomes, users, interactions, activities and business prioritisation. There was only a small amount of content and on planning and co-ordination. Jeff is focused on building the right product, which is exactly the focus that a Product Owner should have. 


Overall it was the best course I have ever attended. The change at work has been profound with many of our attendees now using techniques from the course in our day to day work. There are also plans to consider rolling out more of the approaches and techniques with our upcoming releases.


I highly recommend this course for all managers, coaches, scrum masters, business analysts and of course product owners.


Photo by: Kris Anderson

Saturday, March 24, 2012

Keeping track of great agile books

Helping others to grow, often has me thinking about which articles, books and presentations I should recommend for them to read. With the vast wealth of materials available regarding agile, Scrum and other methods I find that I some times lose track of the material that is most appropriate for people as they progress along their own agile journey.


A simple free tool that I have found that helps with this issue is Library Thing


This site allows me to easily list, rate, tag and categorise all the books that have read or am thinking of reading.  


A quick look at the members who have some of the same books as me revealed a few agile luminaries such as Bas Vodde and J. B. Rainsberger.


I can highly recommend signing up to Library Thing and having a look around.

Full Steam Ahead?


Is the team really working that well, that they have no impediments? I don't think so...

It can take a long time for new teams to feel comfortable to raise their issues and to ask for help.

Christopher Broome from the Scrum Alliance has an excellent post on this subject: I have no impediments.

Picture by:  J. P. Mueller

Saturday, March 17, 2012

User Story Centric Stand ups

As a Scrum team learns to work closely together and to focus their efforts they tend to only have a couple of User Stories in progress at any one time. Working collaboratively with limited work in progress brings several benefits, namely increased shared understanding and a reduced risk of partially completing a User Story.

Unfortunately when Scrum Teams work closely together on a couple of User Stories, their Stand Up Meetings become disjointed. By this I mean that as each person answers the three questions, several people will need to speak out of turn to present a full view of what is occurring and what needs to be done.

Day 229. Lesson Seven, Disco For Old People.

The standard format for Stand Ups where each team member answers the three questions in turn is a Person Centric approach. The standard format is a great way to teach those new to Scrum what information they are expected to provide, what information they should seek and what planning they should carry out.

However when the Scrum team works closely together on User Stories the Person Centric Stand Up no longer represents how the team is working.

Teams use their task board to visually represent the work they are doing and how they do it. I recommend that Stand Ups should also represent how the team is working. Hence when a team is collaborating closely on their User Stories I recommend the team switches to User Story Centric Stand Ups.

User Story Centric Stand Ups

1. In priority order discuss each User Story
        A. As a team update the work that was done since last stand up.
        B. As a team plan the work for today.
        C. As a team discuss any impediments relating to the User Story.
2. Ask the team if there are any other tasks that have popped up.
3. Ask the team if there are any other impediments. I.e. Impediments not directly relating to a User Story.
4. Ask the team if everyone has a clear plan for what to work on next.


This Stand Up format fits in easily with teams that are used to answering the three questions and have moved onto collaborating around User Stories.

User Story Centric Stand Ups are not recommended for new teams, only for teams that are comfortable with the Person Centric Stand Up and work collaboratively around a couple of User Stories.


Photo by: Kris Anderson

Saturday, March 3, 2012

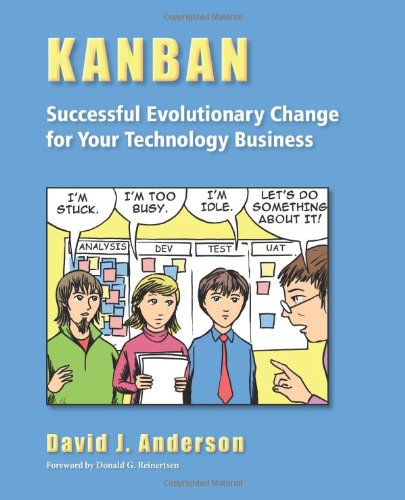
Book review: Kanban, by David J. Anderson


4/5 stars

This book is very easy to read, and focuses on kanban (Japanense visual pull system), and Kanban (Davids Organisational Change Management Strategy).

David does a great job of explaining the theory behind and practical advice on implementing all of the techniques that go with Kanban. His experience with this stuff is throughout the book and these examples help to explain the topics under discussion.

I took a lot of value out the discussion around flow, limiting WIP, bottlenecks, and the history of Kanban.

While I do not think that I would apply Kanban to teams/departments that build large features; I would certainly use it for maintenance/small feature teams. Either way the knowledge around flow, etc is very valuable.

Saturday, February 25, 2012

Leading from the rear

It is early in the morning at the office; your coffee is just kicking in; the team walks over to the Task Board. Small talk starts to build as you all gather; the Scrum Master calls for quiet and then answers the three questions. The team member on their right continues from there and so on.


Question: What is wrong with this picture?


Answer: The Scrum Master went first.


Day 14. The blind leading the blind.


At the start of the Stand Up the Scrum Master is planning their day from yesterday’s news.


When new teams are formed the Scrum Master should go first to model the behavior that they want the team members to emulate. However as the team matures it makes sense for the Scrum Master to switch to going last at the Stand Up. Aka Leading from the rear.


Going last gives the Scrum Master a chance to plan more effectively as they know about all of the current impediments and who/what needs help. This allows them to effectively support the team using the most up to date information available.


It also helps to promote a self-managing team, by pushing the expectation of starting the Stand Up to the team instead of them waiting for the Scrum Master to take the lead.

Photo by: Kris Anderson

Thursday, February 16, 2012

Determining Charters for Communities of Practice

When forming a new Community of Practice (COP), the community members can hold widely differing points of view on what the community should be aiming for and how it should operate. While diversity is important for the strength of a community; these differences can derail some of the positivity that comes with a new community.

To ensure that the vast majority of members of the community receive strong benefit from participating I have found the following approach to be successful.

1. Capture Objectives, Values & Behaviours
2. Survey members
3. Collaboratively create a Charter for the COP
4. Trial and Evaluate

Day 31. School's Out.

1. Capture Objectives, Values & Behaviours
The first step is to sit down with all of the community members one by one and understand what their objectives are for the community, how they think members should behave and what values the community should uphold.

Example Objectives: Develop consistent practices, spread knowledge, recommend how to use …., promote the use of X.

Example Values: honesty, trust, openness, supporting community members, knowledge sharing, mentors others.

Example Behaviours: let others have their say (no talking over each other), turn up prepared for meetings, do not answer phones in COP meetings.

SIDE NOTE: This may reveal some personal conflicts between community members that are best sorted out before proceeding to step 3.

2. Survey members
Next I create a brief survey based on the objectives, values & behaviours that where captured from the community members. I have found that ‘Survey Monkey’ works well for this situation, as it is easy to use, and free for surveys of this size.

Once the survey results are in I analyse them to give myself a picture of what the community member’s desire most (i.e. received plenty of votes) and importantly where the differences are (votes are spread across two or more items). This analysis will help guide how I present items for discussion in the following workshop.

For example; the survey results may indicate that there is strong consensus on the value of ‘knowledge sharing’. This indicates to me that in the workshop I can propose ‘knowledge sharing’ as a community value that has strong support, hence saving time to spend on discussing the more controversial items.

3. Collaboratively create a Charter for the COP in a workshop
To create the COP charter, I schedule an hour long workshop with the COP members should be enough. The goal of the workshop is to get the COP members to create their own Charter. The process of collaboratively creating the charter builds ownership for it. The charter indicates the aims of the community and how they intend to operate while they go about reaching for those goals. The suggested charter will include these sections: Objectives, Values, Behaviours & Operation.

The workshop has the following rough agenda:
1. Set the scene - 5 minutes
2. Decide on the Objectives - 15 minutes
3. Decide on the Values - 15 minutes
4. Decide on the Behaviours - 10 minutes
5. Decide on how the community will operate - 10 minutes
6. Review and agree on the charter - 5 minutes

Set the scene 
Explain the goal of creating a charter with strong consensus from the community and explain the agenda.

Decide on the Objectives
As a group decide on the Objectives for the community. This is done by reviewing and discussing the survey results regarding Objectives. 

Decide on the Values
As a group decide on the Values for the community. 

Decide on the Behaviours
As a group decide on the Behaviours for the community. The community usually has the hang of the workshop by now and generally have less Behaviour items to discuss then Values or Objectives, so I time box this to 10 minutes instead of 15 minutes.

Decide on how the community will operate
Considering the Objectives, Values and Behaviours that have been agreed upon; the group now needs to brainstorm how they should operate to reach their Objectives, while following their values and behaviours. This may include meeting schedules, agendas for meetings, who/how the community is lead, how the community communicates with the rest of the organisation, how the work of the community will be performed, etc.

An example operating model is: 
* Fortnightly meetings
* Meetings are chaired by the Community Leader. 
* Minutes are taken and e-mailed to all stakeholders.

4. Trial and Evaluate
After the workshop the charter should be written up, reviewed and made visible to all COP members. 
As with almost everything to do with agile, now it is time to try it out, evaluate how it worked out and adapt it as necessary. To support this it is a good idea to squeeze in a 5 minute retrospective into any regular meetings to check if the COP is working effectively for its members.

Photo by: Kris Anderson


Saturday, January 14, 2012

Training vs Coaching

I am part way through reading ‘Coaching for Performance:GROWing human potential and purpose’ by John Whitmore. A key point that I have taken away so far is the difference between training and coaching.

A Trainer/Teacher instructs their Student on what and how they should do the new thing that they are learning.

A Coach will lead the student on a journey of self-discovery, aiming for the Student to become aware of the new thing that they are not doing, and then getting them to take responsibility for carrying out the new thing.

I have found that both training and coaching are useful approaches in my work. When the student is very new to subject such as agile; training works well to get them kick started and to secure a few wins, hence building their confidence. Once their foundation knowledge and confidence is in place, moving to coaching builds their awareness and responsibility which leads to long term success.

Sunday, January 8, 2012

The beginning

It has always amazed me how much hard won knowledge is freely available on the internet, especially in blog posts. 2012 is the year that I hope to contribute to that knowledge base.

My first thoughts for a blog were of agile software development. To me agile is currently the best way to build software, however I whole heartedly subscribe to Alistair Cockburn’s Oath of Non Allegiance and hence I wanted my blog to be broader then just my journey towards agile.

This blog is my journey towards better ways of building software; building the right software and building the software right.